Truly Easy Homemade Cheese
☆ June 6, 2011
Ten years ago, I read a profile in The New Yorker about a cheesemaking nun. I have always remembered the piece, the accompanying photograph (just found it online!), and the profound feeling it left me with: I was like, that’s what I want to be when I grow up.
I’ve now taken the first step down that path. I have made my first cheese.
(I don’t count my previous failures as cheese. They were failures.)
Cheese, on the one hand, is complicated and intimidating. On the other hand, it is simple and intuitive. I’m quite certain that milk wants to become cheese. Through my failures, I have realized the most important part about making good cheese is to take it slow. Respect the milk. DO NOT RUSH THE MILK. And the cheesemaking books never tell you this, at least not the ones I’ve read. And the cheesemaking websites act like you must shell out hundreds of dollars on specialty supplies if you wish to make cheese. Not so. A basic stainless steel pot will do the job just fine, or, in a pinch, a calf’s stomach ~ people have been making cheese for thousands of years, long before fancy accoutrements existed.
Last year, I tried to follow the rules and ended up with so many cheese failures that I had given up. But when I started milking Daisy again last week, and found that familiar surplus overtaking my fridge ~ multiple gallons of milk that we couldn’t possibly drink ~ I decided to try again. I needed something simple and gentle and intuitive to ease me back onto the cheese path. In a case of perfect timing, I was inspired by this post on a blog I enjoy. Since I only had fresh milk on hand, I altered her technique just slightly and the results are incredible.
OK! On to the cheese!
It starts with one gallon of milk.
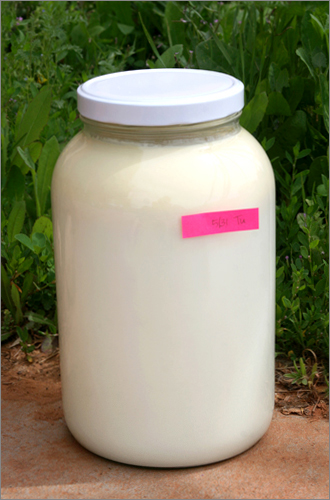
This is fresh milk from my cow. This particular gallon is the equivalent of whole milk; I placed the pink tab at the cream line in case it didn’t show up in the photo. If you’re using store-bought milk, I think using 2% and maybe even nonfat would be fine, though I’ve not tested it out. You certainly don’t have to start with a gallon. For my first batch I used half a gallon of milk but Mike and I loved the resulting cheese so much I went for a gallon this time.
You will also need a pot and a spoon and a lemon and a thermometer.
That’s it.
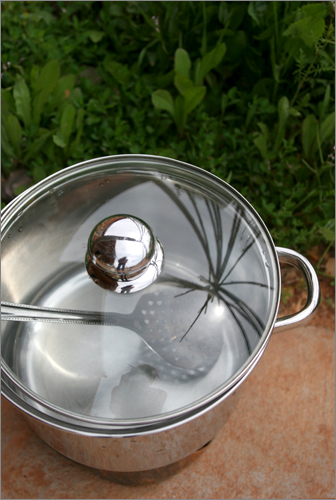
I plugged my hot plate into an extension cord and brought it outside because it was a beautiful day and I prefer being outdoors.
Pour the milk into the pot, cover, and set over low to medium-low heat. LOW TO MEDIUM LOW. Stir the milk every now and then; I found that just rocking the pot with the lid on did the job well. Heat the milk to 170-175 degrees Farenheit. This takes a long time at medium low heat; I timed this batch and it took close to an hour. However, do not rush this part. If you do, your cheese will be gummy and flavorless.
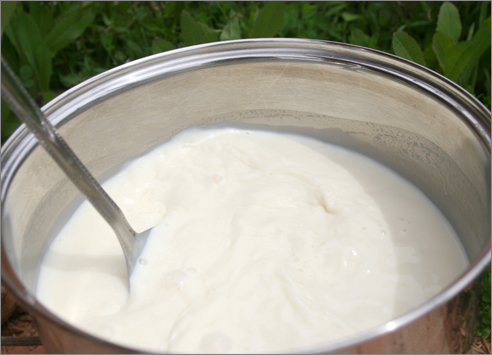
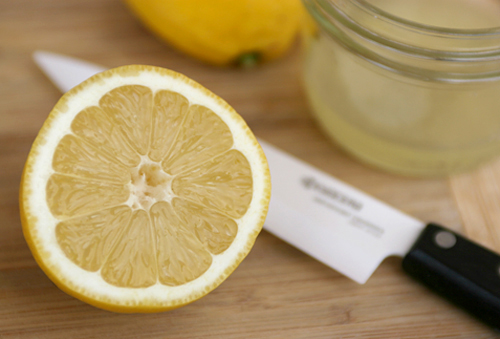
Once your milk reaches a temperature of 170-175 degrees, squeeze the juice of a lemon into a cup and slowly pour it into the milk while stirring. When I used a half gallon of milk, I used the juice of half a lemon (about 3 Tablespoons) and with a gallon of milk, I used a whole lemon.
Almost immediately after adding the lemon juice to the milk, it will separate into curds and whey.
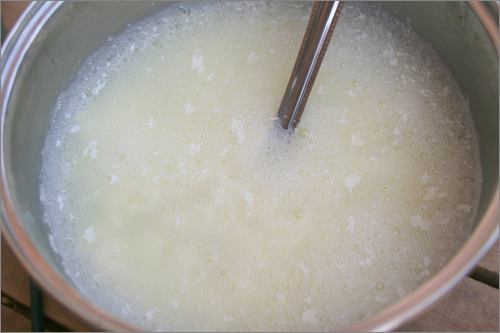
At this point, take the pot off the heat and let it sit for a few minutes just to give the curds time to separate from the whey.

Scoop the curds into a bowl; you could also pour through a tight strainer. I just spoon the curds into a bowl and then mash them with the slotted spoon to press out any remaining whey. At this point, you can add salt, herbs, garlic, whatever you fancy. Just mix it in to the curds and taste as you go.
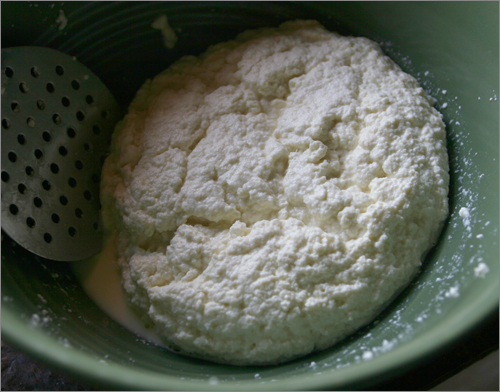
And this is cheese! You could put it in a square of cheese cloth (not the whispy kind; real cheese cloth has a tighter weave, like flour sack cotton) and hang it to drain all the whey for a harder cheese, but I just mash out whatever whey I can, then pack the soft cheese into pint jars. The miniscule amount of remaining whey does not adversely affect the cheese, and I noticed it fully integrates back into the curds and kept it soft and creamy.
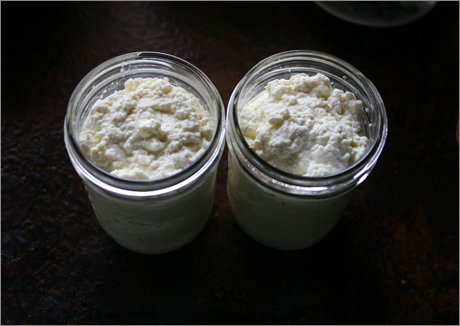
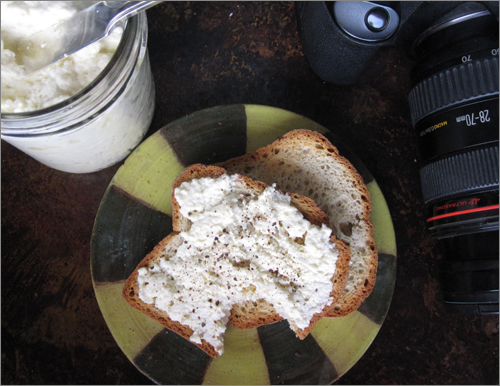
One gallon of milk makes two pint jars of cheese. It stores well in the fridge and the consistency is amazing and hard to describe – it’s dense but spreadable and creamy. I like it with a little pink himalayan salt mixed in, spread on toast with fresh ground pepper on top. Try it – and leave a note in the comments telling us how it went! It’s really easy. And REALLY good.
Comments
74 Responses to “Truly Easy Homemade Cheese”
Leave a Reply


June 6th, 2011 @ 12:07 pm
Making mozza isn’t much harder or longer than this process (I think you’ve made the equivalent of ricotta?) New England Cheesemaking (cheesemaking.com) has pretty inexpensive supplies (shipping to Canada, too, yay!) and step by step tutorials.
June 6th, 2011 @ 12:22 pm
Yay! Shreve you made Indian Paneer!
Next up, try your hand at Mozzarella!
BUY some rennet from Ricki Carroll at cheesemaking.com and you can make Mozzarella in
30 mins!
Note: Store bought milk is UHT milk and although you can make paneer like Shreve with UHT milk, you cannot make mozzarella or any other kind of cheese out of UHT milk. The protein is damaged in UHT milk and cannot form proper curds in the cheesemaking process.
Also, supermarket Rennet (aka Junket) will not work in cheesemaking, it does nothing.
Unless you can get low heat pasteurized milk or raw milk like Shreve you can use a mixture of nonfat dry milk and cream or whole dry milk. Dry milk is low heat pasteurized and the protein is intact…
Happy Cheesemaking!
Shreve if this is too much info just delete it.
June 6th, 2011 @ 12:25 pm
I made my first cheese this year in a very similar manner, and was so wildly excited I couldn’t stop telling everyone about it. Then got that line from Monty Python stuck in my head – “blessed are the cheesemakers”.
The recipe I used was described as the Indian method of making paneer, though I expect every dairy culture has its equivalent. I wish I had Daisy’s lovely fresh milk though. :)
June 6th, 2011 @ 12:36 pm
Excellent!
June 6th, 2011 @ 1:13 pm
Would this be like home made cream cheese?
A note on the whey.
I’ve been learning how to make mayonnaise from scratch. Mixed results on flavor as I haven’t settled on an oil I like or the right balance of vinegar/lemon juice.
But the sight I use says if you add a little whey to your finished mayonnaise it will keep much longer in the refrigerator.
Just in case you want to venture into the mayonnaise making business too.
I can get whole raw milk from my local organic grocery store. I’ve been thinking of trying cheese. I bookmarked a website or have a magazine article around somewhere for making mozzarella and I’ve been dying to try that. But I guess I should start with something a little simpler.
As another aside, I had to make home made buttermilk for a bread recipe and I ended up with exactly what you did: curdled milk. You can use lemon juice, vinegar or (I think) cream of tartar. I imagine they each make a different tasting curds and whey.
Too bad you don’t have goats or sheep to milk. I’ll bet they’d make awesome cheese too.
Yay to Daisy!
June 6th, 2011 @ 1:20 pm
i make this cheese quite often. it tastes even better with some buttermilk thrown in. also the whey is great as soup stock.
June 6th, 2011 @ 1:33 pm
beautiful photographs, as usual, and i enjoyed ‘le voyage creatif’ as well. thanks for both!!
June 6th, 2011 @ 1:43 pm
I don’t know what it is about the process of cheese making that facinates me so much, but I am always enthralled! I remember as a youngster my favorite clips on Sesame Street were the ones on making cheese. I’m inspired to try it myself now.
June 6th, 2011 @ 1:47 pm
I have a friend who does this with vinegar, and store-bought milk. She was raving about it last year. I always thought it sounded fun!
June 6th, 2011 @ 1:49 pm
OK all you cheesemakers – will this work with sheep or goat milk? Can it be store-bought?
June 6th, 2011 @ 2:31 pm
HA! I just did this same recipe with a friend yesterday afternoon! We were using store bought milk and wern’t getting much seperation with just a lemon, but vinegar definately did the trick. It wasn’t as sweet using only vinegar, so we ended up using both. 1/2 gallon milk, 1 whole lemon and 2 teaspoons vinegar. Yummy!
June 6th, 2011 @ 3:38 pm
Okay, years ago (before refrigeration) when farmers would save up a few days worth of cream to make butter after milking cows, the cream would go sour a little bit, and then after it was churned to produce butter, the buttermilk that remained in the churn at the bottom would be slightly sour and tangy…
Nowadays with commercial dairies, they dont let the cream sit around to get soured naturally so they must add a bacterial culture to regular milk to create commercial buttermilk.
In a pinch you can add lemon juice to milk to recreate a soured milk for recipes, it will curdle, but what can you do….
June 6th, 2011 @ 3:42 pm
If you like to eat home-grown pork, you could get a couple of weaner pigs and partially feed them with the excess milk. I’ve heard milk-fed pork is pretty dang tasty. I haven’t tried it myself. My small pigs help turn new ground for veggie gardens, and dispose of any trimmings and prunings. Great garden helpers.
Or, find someone else with pigs who raises them like you like, and trade them the excess milk for pork.
June 6th, 2011 @ 4:35 pm
That’s very similar to how I make homemade ricotta, except I use white vinegar instead of lemon jiuce. You are so right, it is so easy and beyond delicious! I can’t even imagine how good it must be with fresh milk straight from the cow!
June 6th, 2011 @ 4:43 pm
Yay! This was such an appropriate lesson for me today. We got our first family milk cow about 3 weeks ago, and I am slowly learning. We’ve been drinking raw milk for about 5 years, so actually having our own sweet giver of milk was a natural transition for us. Can’t wait to try this recipe! Thanks Shreve :)
June 6th, 2011 @ 5:28 pm
Amazing, Shreve. I will absolutely make this, soon!
Question though, I’ve been shelling out $$ for organic raw cheese. But is all milk heated in cheese making, rendering it no longer raw? Have I been paying for “raw” cheese for no reason?
Reading your post though, I think if I get the hang of this… I may never buy cheese again. :)
June 6th, 2011 @ 6:02 pm
I was thinking the same thing as one other commenter. You made Indian Paneer! It’s amazing. You can do it the same way, only to separate into curds and whey you can use a lime instead of lemon. Also, you can pack it very tightly and then you can cut it into cubes like tofu and put it in any meal. It also will freeze. You must use whole milk for the best paneer.
Good for you!
June 6th, 2011 @ 6:13 pm
Maggie ~ no no! many cheeses are made with raw milk to start and the milk is never heated above 85º – 115º depending on the cheese, if memory serves (not sure about the exact numbers but do remember that it was below the “technically raw” temp.) This will be my advanced course :)
Thanks everyone, for the comments and tips!
June 6th, 2011 @ 6:23 pm
So could I make cheese like yours at a lower temperature to preserve the “rawness” of my Organic Pastures raw milk?
June 6th, 2011 @ 6:29 pm
Mmmm cheeeze. (said like Homer Simpson)
June 6th, 2011 @ 7:11 pm
oh that sounds, and looks, so incredibly yummy!!!
June 6th, 2011 @ 7:15 pm
M ~ no – you would need to use a different technique and different ingredients to get the curd/whey separation action. It’s achieved here with acid + heat. Without the heat, you would need rennet, possibly a culture… don’t quote me – this is where it gets over my head. But I do know this technique will NOT work at lower temps.
June 6th, 2011 @ 7:41 pm
I’ve been agitating to start learning to make my own cheese and yogurt and found this site:
http://biology.clc.uc.edu/Fankhauser/Cheese/cheese_course/Cheese_course.htm
When I get back to Virginia, I plant to start at step one with this site as my guide. I so dearly love milk and cheese I can’t wait to make my own. I most want to learn to make brie and swiss.
June 6th, 2011 @ 8:48 pm
So delicious looking and tasty and FRESH!!
Going to have to try it.
I am of Dutch descent…my mom and dad immigrated from Holland to South Africa in the early 1940’s.
I ate cheese EVERYDAY! Gouda,Havarti, you name it. The kids in school called me “Cheesehead”.
Not very nice, but appropriate!
So, it’s time to be a Cheesehaed again. :)
Will let you know.
Thanks for the tutorial with super pictures.
June 6th, 2011 @ 10:39 pm
I,too, recommend New England Cheesemaking Company. She has a very easy to deal with book on cheese making and you can order all the rennet and other supplies you need froem them. FYI, if anyone tries making cheese with store bought milk, you need to look for milk that has not been ultra pasteurized. This process messes with the molecules in the milk and it’s damned near impossible to get curd to form with the stuff.
June 6th, 2011 @ 10:41 pm
Mlaiuppa, the liquid left after the cheese is made is the whey.
June 7th, 2011 @ 12:49 am
I travel with my spouses job full-time and currently we have an apartment (very rare as we’re normally in hotels). There is an Indian family on location with us now and I was dying to to ask the wife to teach me how to make paneer. Palak paneer is one of my faves! Of course, this was before they taught me a couple of dishes and I realized they were both horrible cooks. So happy I found this post! Can’t wait to try it out!
June 7th, 2011 @ 4:44 am
I’m bettin that cow in the pic with the nun LOVES that nun.
June 7th, 2011 @ 7:24 am
I have been making cheese this way for years and you are right, it is so easy, so delicious and allows for so much versatility. I’m currently in Nepal where wifi – even when you’re standing right next to the router is slower than 1997 dial up… Anyways, just got back from a 5 day mountain trek where I was able to buy some yak cheese. All made in the mountains made over a wood fire and without refrigeration. Had my guide interpret for me and got instructions on how to make it. Best part is; it was aged for 3 months without refrigeration. Sooooooo good. If you can find a yak anywhere in or around your state, i’d urge you to get one to add to your farmily. PS: these people used vinegar instead of lemon juice. I’ve used it as well and find it works well.
June 7th, 2011 @ 7:35 am
I’ve also been making cheese this way for a long time! If you’re not making yogurt yet, that’s another very easy thing to do with your surplus milk. Drain it in cheese cloth and you’ll have lebeneh.
Quick tip: Use the leftover whey in place of water when baking breads. You get a more nutritional and longer lasting loaf.
June 7th, 2011 @ 7:53 am
To make mozzarella you just add a teeny bit of rennet to this recipe, sometime after the lemon but before the milk has finished becoming cheese. I make mozzarella at home and it’s really easy, except you have to knead it into shape while it’s really hot, and if you don’t have a microwave then you need some good gloves to stick your hands into a pot of very hot water on the stove. This summer I plan to make mozzarella and knead in the herbs I’m growing in my garden. It’s going to be magical :)
June 7th, 2011 @ 8:00 am
Deanna ~ is that not the greatest photograph?!?
June 7th, 2011 @ 8:01 am
A “Calf’s Stomach”!!!!! Where is Fiona? A current picture please!!
When you said that “this is what I wanted to be when I grew up” I thought “a nun???”
Sorry, feeling flippant this morning, loved the article and would like to try it.
June 7th, 2011 @ 9:10 am
I love cheese made this way, so easy and delicious.
You can also use the leftover whey to make bread – just use it in place of the water in your favorite bread recipe. The result is dense and chewy and has a sourdough tang to it. Yum!
June 7th, 2011 @ 9:42 am
What do you do with all that beautiful whey protein? Wonderful, glorious, natural high protein whey (that more often than not gets thrown away with the rubbish).
June 7th, 2011 @ 9:54 am
Would this work in a slow cooker do you think?
June 7th, 2011 @ 10:00 am
Oh, and are those temperatures in celcius or farenheit? I get confused easily.
June 7th, 2011 @ 10:55 am
Wow – I am so excited to try this sometime soon. It looks like it is almost a ricotta or soft cream cheese. I am already thinking of different combinations of herbs to add too.
If you hang a ball of this cheese to dry and continue to drain whey, I’m guessing it will become harder – will the cheese end up being like a havarti, gruyere, or even a parmesan (if you let it harden for a long time)…
I have so many questions – off to search for a cheese-making for dummies website. :)
Thanks Shreve for posting this – the pictures make it look so easy.
Peace, Kim
June 7th, 2011 @ 2:37 pm
I’d love to try this, but I don’t own a stainless steel pan. Do you have to use one? Will the process not work the same with a non-stick pan?
June 7th, 2011 @ 2:50 pm
oh my dog, if i had a cow to milk i would make this tonight. and every night after!
forgive my ignorance, i don’t normally cook, but can anyone tell me if store bought milk that doesn’t have the cream separating out will work? if i read correctly, shreve says she isn’t certain. thanks, all!
June 7th, 2011 @ 4:17 pm
Well, I found this website that mentions store bought milk: http://biology.clc.uc.edu/fankhauser/cheese/cheese_course/cheese_course.htm
I am so excited to try making cheese soon. I think it would be very gratifying.
June 7th, 2011 @ 7:33 pm
haha! When I read the title of this post, my brain automatically read “Truly Easy Homemade Cheesy” Apparently it’s in a rhyming mood.
This is awesome. I want to try making cheese soon! I’ll be adding this to my list of the gazillion other things that I want to try.
So I don’t really know what whey is, but I gather that it’s the leftover liquid after removing the curds. What else can you do with that aside from making bread (as a few have mentioned)? I would hate to waste it.
June 7th, 2011 @ 11:37 pm
Wow, that is awesome! I gotta try this the next time I have some time and some milk handy.
Thanks Rebecca for the tip about store-bought versus raw milk. I have access to both, but it can be harder to get the raw stuff for sure!
June 8th, 2011 @ 6:44 am
Congratulations Shreve, you’ve made Italian Ricotta or Indian Paneer. Lovely, yummy. Thanks for the reminder recipe and wonderful pictures.
Too bad you don’t have any “poor” kids in your area who would really appreciate and benefit from Daisy’s wonderful fresh milk.
June 8th, 2011 @ 7:10 am
Have you made yogurt yet? You can do it in a crock pot! I make a batch every month- it’s great!
http://crockpot365.blogspot.com/2008/10/you-can-make-yogurt-in-your-crockpot.html
June 8th, 2011 @ 9:21 am
Jo ~ What’s really too bad is that such a plan is much harder to put into action than one would think, thanks to all the bullshit legislation surrounding raw milk.
June 10th, 2011 @ 11:04 pm
I am delighted about this post because I read this same article years ago, clipped it out to share with my mom (who had dreams of making her own cheese), but lost it in one of my many moves! yay! (Isn’t that a great picture!?)
grin, grin, grin. Thanks!
And happy with several of the other posts offering additional recipes and suggestions! Now, I just need Daisy! I adore her. xxoo
June 12th, 2011 @ 1:46 am
Hi there–
I came across your blog though recommended items on my Google Reader. I followed your directions to a tee, I thought… the only problem is my hot milk did not separate into curds and whey as readily. I used whole milk (1 gal) heated on low-medium to about 172F (it was somewhere in between 170 and 175), I slowly added the lemon juice (from one good sized lemon), stirred, removed from heat, I ended up letting it sit for probably 15-20 minutes hoping it would separate and everything would be hunky dory but… It just looks like milk with some teeny chunks in it, but it’s still very much milk. There are some teensy curds in it… is it salvageable? Can you think of any steps I might have missed or do you have any tips for the next go ’round? Thanks!
June 12th, 2011 @ 8:26 am
Hi Christle ~ Oh no! I am no pro and I’ve never done this with storebought milk, but, according to some other lovely commenters, when buying storebought milk for cheese it must NOT be uht or ultra-pasteurized as this destroys the ability for curds to form. And others have mentioned that with storebought milk it might take a bit more acid – two lemons, perhaps, or a few tablespoons of white vinegar – to do the trick.
So, my advice (ignorant as it may be) would be to check the milk carton to see if your milk was ultra pasturized – if so, it will not work; if not, to heat it up again and stir in some vinegar at temp!
June 12th, 2011 @ 10:58 am
Thanks for getting back to me! I added a few tbsp of apple cider vinegar (since that was all I had on hand!) and it helped the curd form quite nicely. I was able to scoop out large curds and there was definitely some separation action, though it didn’t quite separate as nicely as your lovely fresh milk. :) We scooped the curd and let it drain in the fridge overnight, wrapped in some heavy duty paper towels inside a tupperware container and it’s just lovely! Very tasty, creamy and spreadable. My husband LOVES it. :) I think next time we make it I will make sure I have extra acid on hand just in case. We talked about visiting the farmer’s market and purchasing some raw milk to make it. I was born on a dairy (goat) farm and my grandparents used to make cheese all the time! I just loved watching and I think it’s so great that I get to make some here at home, in our tiny apartment. Thanks so much for sharing!
June 12th, 2011 @ 2:18 pm
I tried this today and it’s brilliant! Thank you for sharing this Shreve.
June 12th, 2011 @ 5:06 pm
A & C ~ AWESOME!!! X 2 :)
June 21st, 2011 @ 3:31 pm
Looks yummy! Must be a cheesy time of year. This from Smithsonian – Cheese that squeaks: http://tinyurl.com/6x6az8h
June 27th, 2011 @ 11:45 am
I asked this before, but never saw a reply. Does anyone know if you have to use a stainless steel pot? Will a non-stick pan not work?
June 28th, 2011 @ 6:28 am
Ack! Sorry Beth! I do not know if non-stick will work. I only know that stainless steel or enamel-covered cast iron are the two recommended and that aluminum is not recommended because it is not inert and can affect the chemical process that takes place. So I don’t know where nonstick fits in there! I’d guess that it’s not ideal. Can you borrow a different pot from a neighbor? Tell ’em you’ll pay ’em in cheese!
June 30th, 2011 @ 2:14 pm
I just made it in a non stick pot, with store bought milk. I used a little extra lemon and let it sit for 20 minutes. I got about one pint out of it. Not thinking when I bought the milk, I got low fat. Probably not the best option but it worked none the less. Next time I will get whole milk and maybe try some vinegar and see if I get better separation. Thanks for the post!
July 3rd, 2011 @ 1:55 pm
This reminded me of Junior High school. For science class in 7th grade we made cheese as a science project. It turned out OK, but it mostly tasted like cottage cheese.
July 5th, 2011 @ 1:50 pm
I make cheese all the time as well, but I use citric acid powder instead of the lemon. I also raise the temp higher. It usually only takes me about 20-30 minutes to make a gallon.
November 17th, 2011 @ 8:18 pm
I don’t know how or why, but I seemed to have made some kind of a white crumbly cheese that is delicious on crackers – I did nothing but in true bachelor style forgot a quart of store bought milk in my cooler for a couple weeks, it separated into a watery mix (Whey ?) and a rubbery white substance that looks like the cheese I used to buy when I was living in Mexico – not panela but similar. I did nothing else to make this other than live in Texas during a warm spell when the temps were between 85 to 95 degrees. This is about the 3rd time I had this happen with the same results. Any idea what I made ?
December 14th, 2011 @ 3:21 pm
Just tried this and am very happy with the results. I used a gallon of whole milk and a pint of cream in a crock pot. Used apple cider vinegar to curdle it. I did go a little overboard on the ACV so the end product was a bit sour, but overall very tasty.
To season it, I pureed salted sunflower kernels with a little sunflower oil and a clove of garlic and mixed it into the cheese. Gave it a nutty flavor that tasted great on whole grain baguette.
Thanks for my new favorite snack!
January 19th, 2012 @ 1:34 pm
My cheese came out great. I can’t wait to make more.
August 20th, 2012 @ 4:41 am
THANK you for this recipe! It’s my first time attempting to prepare cheese and I’m already feeling it’ll be great! But just wondering — how long will this cheese last in the fridge?
August 20th, 2012 @ 5:01 pm
[…] DIY #Fail? Being someone who’s never made cheese before, I didn’t know that citrus juices make milk curd. So in the end, because of the slightly curdy texture, it was like doing a foot soak in baby puke […]
January 11th, 2013 @ 3:52 pm
I am making mozzarella cheese with my daughter tonight, I really wish I could raise a cow in the neighborhood I’m in! Daisy IS beautiful!
Yogurt Cheese (also delicious):
plain yogurt poured into cheesecloth
place over container
whey drips out
remaining = yogurt cheese (thick and creamy like goat cheese) it’s delish!
March 2nd, 2013 @ 1:07 am
Awesome!
Tried it today with vinegar, fresh squeezed orange juice, and 1% milk.
Got about 1/4 cup cheese from 1L milk
Very flavorful
Strong cheese taste with a hint of fresh sweet
oranges; fantastic on toast!
March 12th, 2013 @ 6:18 pm
Really very beneficial suggestions are supplied here.
thank you so much.Keep in the great works .
March 16th, 2013 @ 3:06 pm
I made this cheese. your right it is so easy to make.when i made it i put hot chili flakes in it and my wife and son we all loved it
April 20th, 2013 @ 5:26 pm
This is a very good tip especially to those new to the blogosphere.
Simple but very accurate info… Thank you for sharing this
one. A must read post!
April 23rd, 2013 @ 12:44 am
I’ve been surfing around online in excess of two hrs today, and after finding you on http://honeyrockdawn.
com/2011/06/truly-easy-homemade-cheese/comment-page-2/, I
definitely haven’t discovered any interesting posts like yours. In my view, if all web site entrepreneurs and bloggers produced great content material as you did, the internet will be a lot more helpful than at any time earlier.
June 13th, 2013 @ 6:27 am
I’ve recently developed an interest in cooking and making my own little amateur tidbits. Your article was simple, clear and fun to read. I salted up my end result and packed it into a little glass bowl and I was very proud of my first ever cheese ^^
Thank you!
October 26th, 2013 @ 1:03 pm
Just made a batch with some sour milk. I’ve been looking for a simple recipe every since I looked up Farmer’s Cheese. A local restaurant puts Farmer’s cheese on one of their salads. Delicious. My first batch is pretty good. Definitely had to salt it to get some flavor. I must have had low acidity lemons because I didn’t get good curdling with 1/2 gallon milk and juice from one lemon. 1 tablespoon vinegar and wha-la – cheese. I look forward to more experimenting. Thank you.
January 11th, 2014 @ 12:48 am
I just tried this after I saw your recipe! Thank you so much for putting it up, this is the only recipe that did not involve unhealthy dairies such as heavy cream! So fast and easy, and it was super satisfying to watch the milk curdle. This was my first time making cheese, and it turned out perfect! Thanks!
Alex
http://www.freshhealthynatural.com
February 28th, 2015 @ 2:45 pm
Great to see so many interested in homemade!!! I get a great soft creamy cheese by clabbering whole raw milk. Place 1 pint whole milk in a quart jar, place a properly sized piece of paper towel on top with only the ring of canning lid combo(no flat cover). This allows in air and other natural elements to start the fermentation process. Leave set on kitchen counter for 4 days carefully swirling and mixing milk 2 or 3 times a day. Room temp should be Oh maybe 65 to 75 degrees. Milk will thicken as time passes and lumps of solids will form separating into curds and whey and it will start to smell wonderful! After 4 days(or maybe a little more) strain through a slightly worn thin cotton dish towel. Add salt and what ever else is preferred and enjoy!!! Saves washing the kettle, you don’t destroy it with heat,and saves the lemon for a pie!!!!!!!!! Steve.
October 16th, 2016 @ 3:39 pm
Tasha Edenholm So Truly Real Benjamin Baby
[…] y not the best option but it worked none the less. Next time I will get whole mi […]